Showing posts with label projects. Show all posts

Wednesday, May 4, 2011

Lil Athlete Birthday t-shirt

Sad, but true, Lil Mister is turning 4 on Friday. *sniff, sniff* We started what will end up being a week-long celebration of his birthday last Saturday {a post is coming on that soon!} and, of course, I was concerned with what he should wear!!  I wanted something that he could wear more than just once, so "Birthday Boy" was OUT!  I was also looking for 2 little boy gifts...one for his buddy whose birthday is May 12th and one for my sister's lil man whose birthday was yesterday.  Man, there were a lot of little boys born in May of 2007!

So, the Lil' Athlete Birthday t-shirt was born...


He liked it!  I know you can't see his face, so just envision his ridiculously huge smile...{covered in cupcake!}


Like it?  Want one?  I'm thinking about offerring a custom one (or two or three) in my upcoming auction.  I really think it would even be cute on a little girls fitted t-shirt.:)


Friday, February 4, 2011

American Girl Doll Quilt {Tutorial}

 Looking for our Adoption Auction?  Click here. Ends tomorrow!!
.........................................................................................................................
Photobucket

Yesterday, Melia and I fired up our sewing machines and used some fabric straps to create this cute little doll quilt perfect for Melia's American Girl doll! :)
I had so much fun posting my last tutorial here, that I decided this fun little snow day project was worth sharing, too!  This one is

Photobucket

Materials Needed:

5 strips of fabric in your choice of colors (4" x 20" each)

1 larger piece of fabric for the backing (20" x 16.5")

1 piece of thin quilt batting (19" x 15.5")

Scissors or rotary cutter with mat

Sewing Machine

1. Cut backing fabric and strips of fabric for the front.  I held the straightedge on my mat and had Melia used the rotary cutter since her hands were too little for the fabric scissors.
 2. Lay out the fabric strips in the order in which you would like them on the quilt. *Trim at this point if needed.
 3. Sew fabric strips right side together.  We skipped the step where you pin the strips since we had four hands for this project! 
Melia used her little Pixie sewing machine and I guided the fabric through while she used the foot pedal.  She was so cute and kept telling me to "watch your thumb, mommy".   P.S. That pile in the back is not the laundry...it's a pile of projects waiting to happen! :)

 4. Cut the batting to size and lay on top of the backing fabric.
 5. Iron the backing fabric and the panel made by the fabric strips (be sure to iron the stitched edges all the same way to create stronger seams).

6. Sew together the right sides of the fabrics with the batting on the outside of the backing fabric using a 1/4" seam.  Leave a hole unsewn large enough to flip the quilt inside out.

7. Cut the corners and flip rightside out.

 8. Sew a 1/4" seam around the outside of the quilt, creating a finished look and holding the batting in place.
9. Smile proudly and hold up your doll's new quilt! :) 
Yes, that is a tent in our living room...just one of our many fun snow day/night activities on our week off of school!! :)

Let us know if you make one of these!


Tuesday, February 1, 2011

Upcycled T-shirt Dress {Tutorial}

 Looking for our Adoption Auction?  Click here. :)
.........................................................................................................................

It is snowing like crazy here!  This is the last pic of our deck I got before dusk...
Last I heard, we got 19.5 inches!  I feel like I live in Alaska with my buddy Anne! :)

It looks like we are going to be stuck inside for several days, so my sewing machine is going to get some good use!!!

In the spirit of the snow and because of some inspiration I got from this tutorial by Cheri at "I Am Momma, Hear Me Roar!", I made this upcycled t-shirt dress for Miss Melia today:
Photobucket
Since I made several changes from the original tutorial, I thought I'd do my own tutorial.  I'm a first timer, here, so bear with me!

Materials needed:

1 short sleeved shirt correctly sized for the child (M's was a size 6 that I picked up at Wal-Mart for $2)

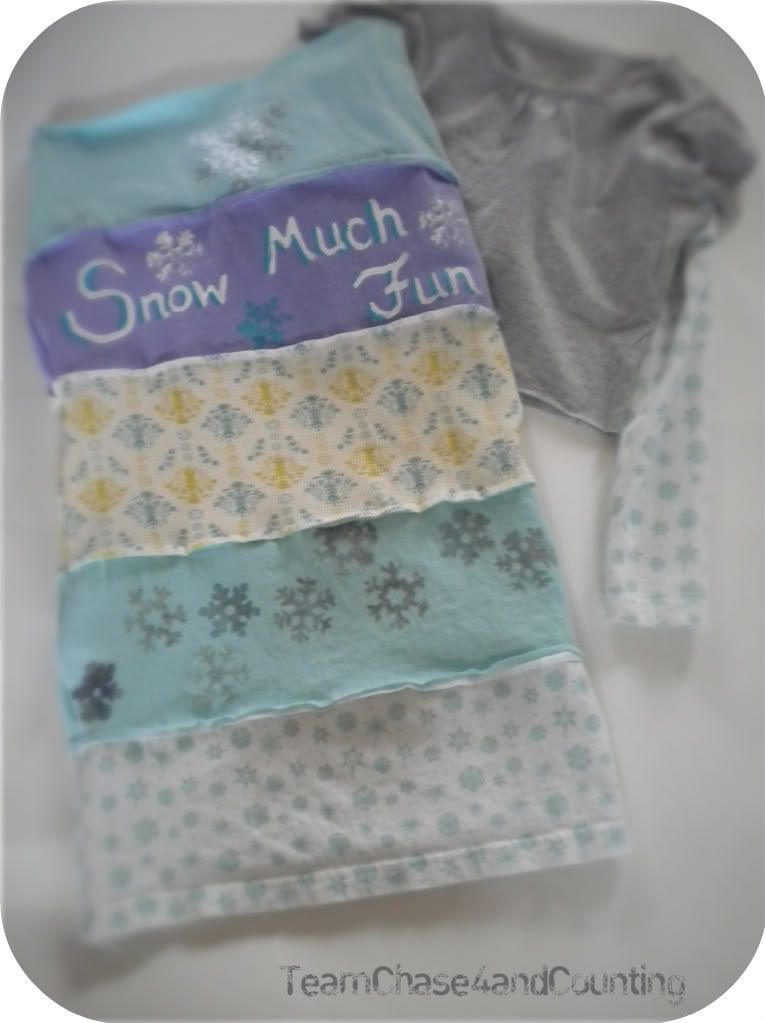
A variety of t-shirts in any color/print that you wish (one should be long sleeved)

Scissors

Sewing Machine

Cute Little Girl

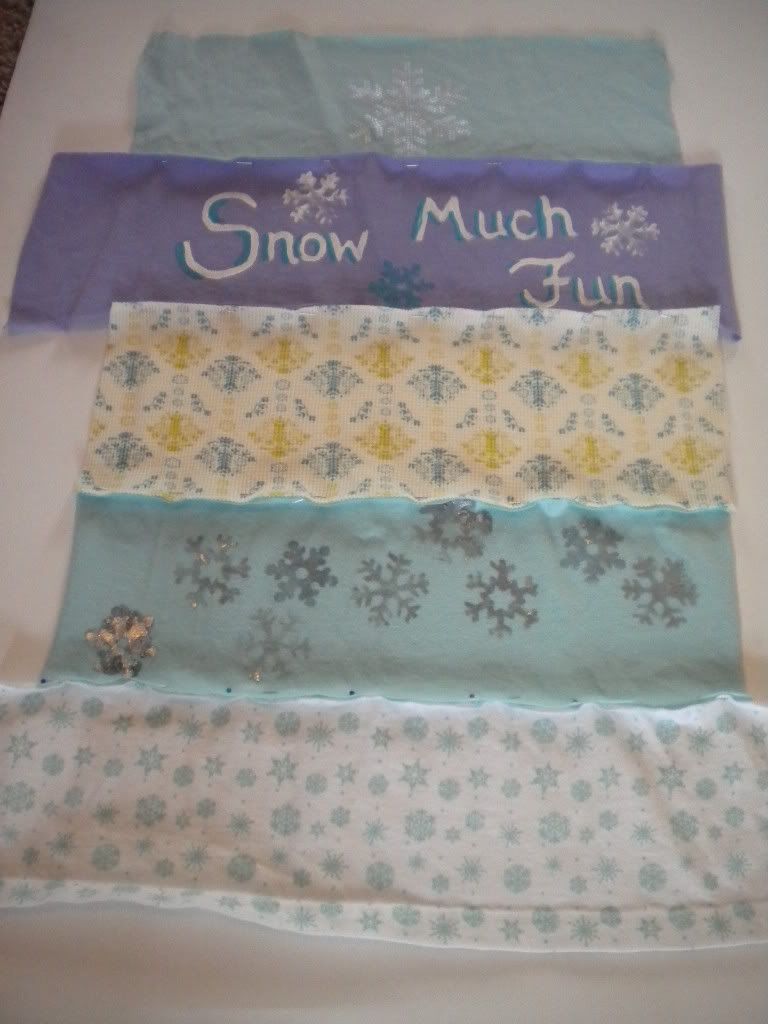
1. Cut out strips of the t-shirts.  I did 2 sets of 5 strips (one set for the front, one set for the back).  I cut each strip 5" wide.  Make sure they are wider across than the width of the small t-shirt. 

2. Lay the strips out to arrange them as you want them.  At this point, decide if you need to "embellish" any of the strips.  We used the stamp/fabric paint technique from the above mentioned tutorial.
Photobucket 
I had the kids do this part, but it kinda stressed poor Camden out.  Who knew he was such a perfectionist?!

Photobucket
I painted the purple part according to Melia's specifications.:)

3. Pin the pieces together.  I liked the idea of having the rough edges out, so I pinned the wrong sides together.  I also used Cheri's advice about the bottom strip, using an already existing seam at the bottom.  Sew these pieces so that you have a front panel and a back panel. 
Photobucket
4. Use a straight edge and rotary cutter to straighten up the sides.  You want the bottom to be just slightly wider than the top.  Pin and sew the two panels together, right sides together, and then turn right side out.

Photobucket

5. Measure your little model's arm from shoulder to wrist and cut the sleeves off the long-sleeved shirt at that length.  Cut the sleeve down the seam and hold the sleeve up to your model's arm, pinning it all the way up where you need to sew it. 
Photobucket
6. Sew the sleeves up to create a smaller sleeve (it will be a tube).  This would be a good step to use a serger if you have one.  If not, cut the excess material from the sleeve.
PhotobucketPhotobucket
7. Make sure the sleeve is inside out and turn the little shirt (the top shirt) inside out.  Cut the long sleeve at an angle and pin the top edge of the long sleeve to the seam where the short sleeve meets the shoulder.  I tried this on my 'lil model to make sure the sleeves were the correct length.
Photobucket

Photobucket

8. Sew around the seam to attach the long sleeve and turn right side out.
9. Slide the dress part into the little shirt, pin in place, and sew around, leaving the top edge rough.Photobucket

And, you're done!!
PhotobucketPhotobucket
I also made a little matching purse using some of one of the shirts for the main part and the bottom seam of the gray shirt for the handles.  And, what's a custom dress without a custom headband?  I just used the seam of the purple shirt, sewed it to create a finished look, and tied a few of the cotton scraps together for the "bow".  Cute!

The best part?!  As I was putting this together, I was thinking about where these shirts came from.  Guess what?  I only bought the gray one (for $2)!  The long sleeved one and the seafoam colored one were given to me by my mom.  I got the off-white damask one from my friend, Tiffany Jett's garage sale a couple years ago.  And the purple one was from a t-shirt stash that my friend, Kristin Perry, gave me!  I would definitely say this was the most inexpensive project I've ever done!

Hope you're inspired to make your own!

The Loft Bed

 Looking for our Adoption Auction?  Click here. :)
.........................................................................................................................

In a post I did awhile back, I mentioned the totally rockin' loft bed that Trevor made for Melia.  It is finally getting the post it deserves!! 

When Trev and I started talking about where we would put our kiddos when we bring them home from Africa, we decided we needed more space.  Since finishing our basement is not a feasible option for now, we figured we should raise the kids' beds up to make room.  So, for Melia's birthday, she got a loft bed!

I LOVE this one from Pottery Barn!
Camp Bunk Bed

I wanted it, but in white, and was absolutely NOT going to pay $1,200 for it!

So, the camp bed knock-off was born...

Note the wainscoting on the outside like the PB version! :)
He put cork board up for a bulletin board on one side...
 
...and a whiteboard on the other side!
 
 The carpenter himself!!
 Yep, she loves it!  To be honest, so does Camden...he calls the reading nook underneath his "office" and does really important stuff under there (like play with his legos!).

So, here is why my husband is a rockstar on this project:
  1. He did it for about $200 (1/6th the PB Price)
  2. He added those awesome extra things (the whiteboard and the bulletin board)
  3. He made it where he can add the bottom bunk if we adopt a girl
  4. He did not totally wreck the house while he did this project
  5. HE DID THE WHOLE THING WITHOUT A BLUEPRINT!  It's true...the only plan he used was some sketches he did with a couple of guys from work and his own concept!
Hope he's ready to do Camden's in May! ;)

P.S. Thanks, Richard Jett, for hanging out and helping Trev with this project!

Wednesday, January 12, 2011

Most Likely to....

You know those superlatives for yearbooks (most likely to succeed, etc.)?  Well, if I assigned superlatives to my projects, this one would win the award for most liketly to...

Never Be Repeated!

Let me go back to the beginning.  My husband is SUPER picky.  So, picky, in fact, that I basically never buy him any article of clothing (or anything else) that he has not pointed to specifically and said, "I want one of those."  When we were dating, I made the mistake of picking out things for him and they would hang in his closet with the tag still on them until years later when he'd slip him in the DAV donation bag (yes, I noticed!). 

Anyway, when he asked me to make him something, I was pretty excited about it.  It was kind of a compliment, actually!  So, I said sure, bought some black fleece (from JoAnn's) and found a shirt to upcycle (for the exterior), and set out making his hat today.  It's just a stocking cap and looks pretty simple, but it wasn't!!  It didn't take a long time, but it was kinda hard to figure out.  Several alterations later, here it is...


At least he likes it!

And, he just asked me to make him another with just the fleece.  I guess it needs a new superlative!!


Monday, January 10, 2011

Sew Cute--Part I

I'm a sucker for cute!  When my kiddos got these little iPOD shuffles for Christmas, I knew they needed something to carry them in.  What a great excuse to sew something tiny!  So, here they are...
Photobucket
Teeny, tiny drawstring bags!  :)

Photobucket
Melia picked a pretty floral print and I coordinated it with a pink polka-dotted ribbon.

Photobucket
Camden went with Mickey Mouse and I used a thin white rope (a little more "manly" :)).

Photobucket
Photobucket

I think they liked them.:)

I have one more itty bitty project in the works, so tune in next time for Sew Cute--Part II.:)


Sunday, January 9, 2011

Curtains and a Camera Strap

I just realized that I never posted about our room since I finished the curtains.  So, here it is...
Photobucket

I used this damask fabric...
Photobucket
I love how the curtains make our room feel warm and complete!  If I would have known, I wouldn't have waited four years to put them up. :)

Also, I spent the afternoon with my SIL, Jennifer, today and we made this for her Camera strap...

Photobucket

I know these camera straps are all over the blogworld, but I am not fortunate enough to have an SLR, so this was the first opportunity I've had to make one.  I really loved the look of this quilted guitar strap, so I combined it with this camera strap tutorial.  It was a little tight, so if I was going to make another (like when I am fortunate enough to buy my own camera:)), I would make each side 3.25" instead of 2.75".  Anyway, I LOVE how it turned out and I hope Jen loves it, too! :)


Related Posts with Thumbnails